Docker 仓库管理
背景:在执行 docker pull 命令时,其实就是从 Docker 公司的公共仓库获取镜像,说得更直白点就是从 registry.hub.docker.com 这个网址去查找。但是当私网服务器无法访问公网,或者为了避免把商业项目暴露在公共环境时,就有了私有仓库的用武之地。

- 私有仓库,也就是在本地(局域网)搭建的一个类似公共仓库的东西,搭建完成之后,我们可以将镜像提交到私有仓库中。这样既能使用 Docker 来运行项目镜像,也避免了项目暴露出去的风险。
- 搭建私有仓库
[root@C1 ~]# docker pull registry    <<< 下载 registry 镜像,用于搭建私有仓库
[root@C1 ~]# docker run -d -p 5000:5000 registry
9db5ddb37db6ee3fee10020d6d5c34e3633323b65c233e47e960aec673400d2f
[root@C1 ~]#
[root@C1 ~]# curl 127.0.0.1:5000/v2/_catalog    <<< 访问并查看仓库
{"repositories":[]}        <<< 此时仓库是空的,返回值是一个 json
[root@C1 ~]#
''' 添加私有仓库到配置文件 '''
[root@C1 ~]# vim /etc/docker/daemon.json
{
  "registry-mirrors": ["https://registry.docker-cn.com", "http://hub-mirror.c.163.com"],
  "insecure-registries":["192.168.51.51:5000"]    <<< 添加私有仓库 ip:port 到配置文件
}
[root@C1 ~]# systemctl restart docker    <<< 重启服务
[root@C1 ~]# docker ps -a        <<< 重启服务,所有容器均处于 stop 状态
CONTAINER ID        IMAGE               COMMAND                  CREATED             STATUS                          PORTS               NAMES
9db5ddb37db6        registry            "/entrypoint.sh /etc…"   32 minutes ago      Exited (2) About a minute ago                       blissful_wilson
1fe30850f22d        centos              "/bin/bash"              25 hours ago        Exited (137) 25 hours ago                           epic_elbakyan
[root@C1 ~]#
[root@C1 ~]# docker start 9db5ddb37db6    <<< 启动 registry 容器
9db5ddb37db6
[root@C1 ~]#
[root@C1 ~]# docker images
REPOSITORY          TAG                 IMAGE ID            CREATED             SIZE
centos              latest              67fa590cfc1c        6 days ago          202MB
registry            latest              f32a97de94e1        5 months ago        25.8MB
[root@C1 ~]#
[root@C1 ~]# docker tag centos 192.168.51.51:5000/centos    <<< 打tag,必须带私有仓库的 ip:port
[root@C1 ~]#
[root@C1 ~]# docker images
REPOSITORY                  TAG                 IMAGE ID            CREATED             SIZE
centos                      latest              67fa590cfc1c        6 days ago          202MB
192.168.51.51:5000/centos   latest              67fa590cfc1c        6 days ago          202MB
registry                    latest              f32a97de94e1        5 months ago        25.8MB
[root@C1 ~]#
[root@C1 ~]# docker push 192.168.51.51:5000/centos    <<< 上传镜像到私有仓库
[root@C1 ~]#
[root@C1 ~]# curl 127.0.0.1:5000/v2/_catalog
{"repositories":["centos"]}
[root@C1 ~]#
''' 其他设备通过如下方式从私有仓库获取镜像 '''
[root@C2 ~]# docker pull 192.168.51.51:5000/centos

## 遇到无法访问 5000 端口 ##
[root@C1 ~]# firewall-cmd --zone=public --query-port=5000/tcp
no
[root@C1 ~]# firewall-cmd --zone=public --add-port=5000/tcp --permanent
success
[root@C1 ~]# firewall-cmd --reload
success
[root@C1 ~]# firewall-cmd --zone=public --query-port=5000/tcp
yes
[root@C1 ~]#

## 遇到报错 ##
' Error response from daemon: Get https://192.168.51.51:5000/v2/: http: server gave HTTP response to HTTPS client '
' 解析:docker registry交互默认使用的是 HTTPS,但是搭建私有镜像默认使用的是 HTTP 服务 '
[root@C2 ~]# vim /etc/docker/daemon.json
{"insecure-registries":["192.168.51.51:5000"]}    <<< 加入
[root@C2 ~]# systemctl daemon-reload
[root@C2 ~]# systemctl restart docker
Docker 数据管理
背景:Docker 的存储驱动的实现是基于 Union File System,简称 UnionFS,他是一种为 Linux 、FreeBSD 和 NetBSD 操作系统设计的,把其他文件系统联合到一个联合挂载点的文件系统服务。它用到了一个重要的资源管理技术,叫写时复制。写时复制(copy-on-write),也叫隐式共享,是一种对可修改资源实现高效复制的资源管理技术。对于一个重复资源,若不修改,则无需立刻创建一个新的资源,该资源可以被共享使用。当发生修改的时候,才会创建新资源。这会大大减少对于未修改资源复制的消耗。Docker 正是基于此去创建 images 和 containers。
Docker-CE 目前默认使用 OverlayFS,OverlayFS 也是采用 UFS 模式。在 Docker 中主要有 overlay 和overlay2 两种实现。Docker-CE 目前默认采用 overlay2。—— 官方文档有详细介绍
- 一个 Docker 镜像本质上是一组文件,Docker 容器其实是在镜像的最上层加了一层读写层,通常也称为容器空间。在运行中的容器里所做的改动,如写新文件、修改已有文件、删除文件等操作其实都写到了容器空间。容器删除了,最上层的读写层跟着也删除了,改动自然也丢失了。
若想将持久化数据,或是多个容器间共享数据,需将数据存储主机的文件系统中。Docker 管理数据的方式有两种:
- 数据卷
- 数据卷容器

数据卷:数据卷是一个或多个容器专门指定绕过 UFS 的目录,为持续性或共享数据提供一些有用的功能
- 数据卷可以在容器间共享和重用
- 数据卷数据改变是直接修改的
- 数据卷数据改变不会被包括在容器中
- 数据卷是持续性的,直到没有容器使用它们
''' 将宿主机的 /opt/docker/data 目录映射到容器的 /data 目录 '''
[root@C1 ~]# docker run --name centos_volume -itd -v /opt/docker/data:/data centos
6db8ce672ff638cae594f0892cb3630f5bdc2b255c62f158d871e48f8706748a
## 注:如果宿主机上文件夹不存在,docker 可以自动创建这个文件夹 ##

''' 测试 '''
[root@C1 ~]# docker exec -it centos_volume bash
[root@6db8ce672ff6 /]#
[root@6db8ce672ff6 /]# echo "hello docker volume" > /data/test.txt
[root@6db8ce672ff6 /]# exit
exit
[root@C1 ~]# cat /opt/docker/data/test.txt    <<< 容器内的文件操作,记录到了宿主机
hello docker volume
[root@C1 ~]#
## 注:默认挂载卷是可读写的,可以在挂载时指定为只读(ro) ##
[root@C1 ~]# docker run --name centos_volume2 -itd -v /opt/docker/data:/data:ro centos
- 数据卷容器:如果有一些持久性的数据想在容器间共享,或者想用在非持久性的容器上,最好的方法是创建一个数据卷容器,然后从此容器上挂载数据。作用有些类似于 Linux 下常用的 NFS。
''' 创建数据卷容器 '''
[root@C1 ~]# docker run --name volume_share -itd -v /opt/docker/data_container:/data centos
fd177844b2878f070122a672d51f170026881110bcea71025a11f41e7713cc0a

''' 运行另一容器,使用--volumes-from 挂载/data卷 '''
[root@C1 ~]# docker run --name centos_cont1 -itd --volumes-from volume_share centos
a745e9fa44eac788b00e53a074948cc1d1e6de52db611c1ade3f0f9a8c02c480
## 注:不管 volume_share 容器是否运行状态,其它容器都可以挂载该容器数据卷 ##

''' 测试 '''
[root@C1 ~]# docker exec -it centos_cont1 bash
[root@a745e9fa44ea /]# touch /data/test{1..9}.txt
[root@a745e9fa44ea /]# echo "hello docker volume container" > /data/test.txt
[root@a745e9fa44ea /]#
[root@a745e9fa44ea /]# exit
exit
[root@C1 ~]# ls /opt/docker/data_container/
test1.txt  test2.txt  test3.txt  test4.txt  test5.txt  test6.txt  test7.txt  test8.txt  test9.txt  test.txt
[root@C1 ~]# cat /opt/docker/data_container/test.txt
hello docker volume container
[root@C1 ~]#
Docker 网络管理
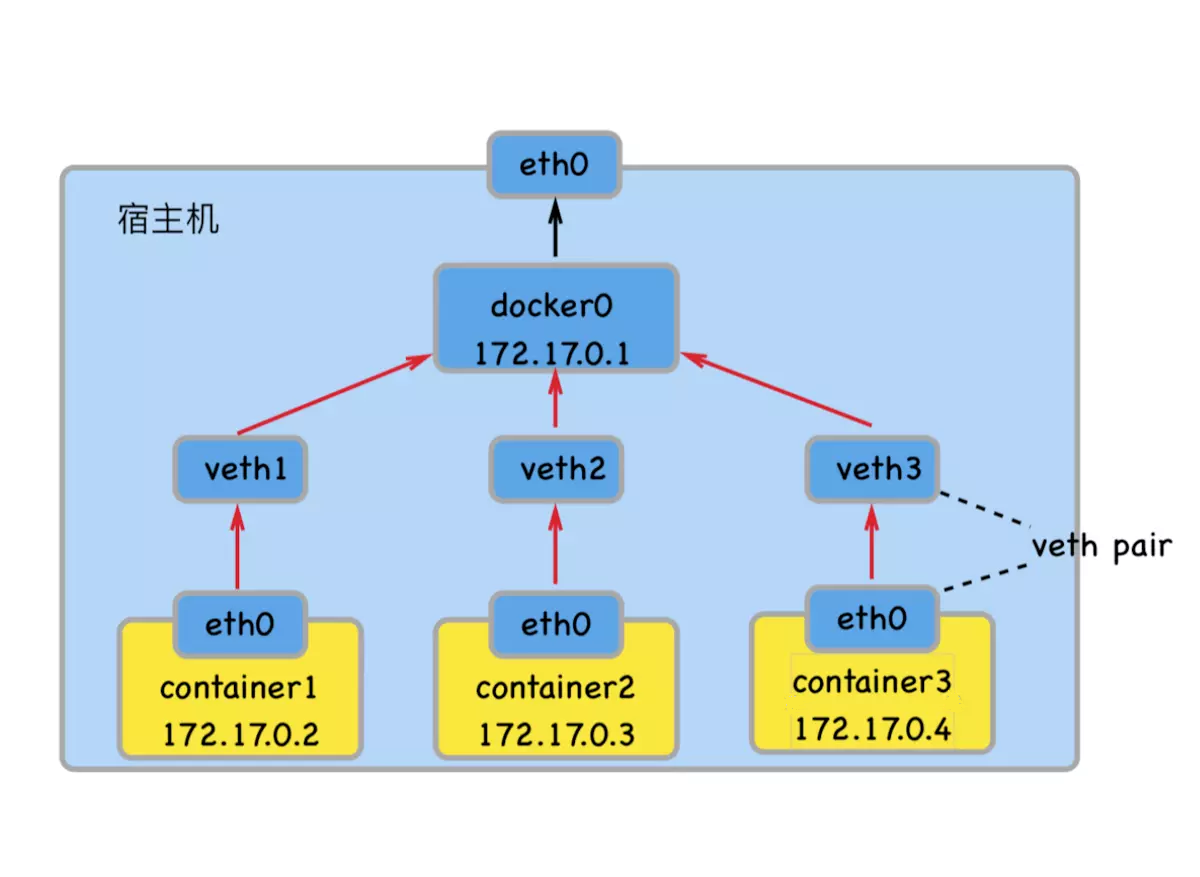
背景:Dokcer 通过使用 Linux 桥接提供容器之间的通信,docker0 桥接接口的目的就是方便 Docker 管理。当 Docker daemon 启动时需要做以下操作:
- creates the docker0 bridge if not present ## 如果 docker0 不存在则创建
- searches for an IP address range which doesn’t overlap with an existing route ## 搜索一个与当前路由不冲突的 ip 段
- picks an IP in the selected range ## 在确定的范围中选择 ip
- assigns this IP to the docker0 bridge ## 绑定 ip 到 docker0
Docker 的五种(五类)网络模式
- bridge 模式(默认)
- host 模式
- container 模式
- none 模式
- user-defined 模式(软件桥接、Macvlan、Overlay、…)
- Docker 基本网络操作
''' 查看网络对象列表 '''
[root@C2 ~]# docker network ls
NETWORK ID          NAME                DRIVER              SCOPE
8f93403ddf03        bridge              bridge              local
00c0f3debc54        host                host                local
a5c8011ebbe5        none                null                local
[root@C2 ~]#
## 注:
##  1. Docker安装完后,会自动创建bridge、host、none三种网络驱动模式。
##  2. host和none模式网络只能存在一个,bridge和Macvlan可以有多个。
##  3. Docker自带的Overlay网络创建依赖于docker swarm(集群负载均衡)服务。

''' 创建新的网络对象 '''
docker network create [OPTIONS] NETWORK

''' 删除网络 '''
docker network rm NETWORK [NETWORK...]

''' 断开连接 '''
docker network disconnect [OPTIONS] NETWORK CONTAINER

''' 查看网络详情 '''
docker network inspect [OPTIONS] NETWORK [NETWORK...]

''' 使用网络 '''
第一种:docker run --network=<network-name>    ## 启动容器同时,将其连接到网络
第二种:docker network connect [OPTIONS] NETWORK CONTAINER    ## 将容器与指定的网络进行连接
bridge 网络模式
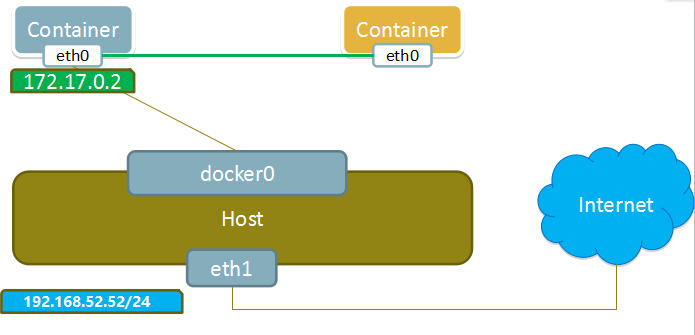
- 启动 Docker 时会在主机上创建一个名为docker0的虚拟网桥接口;
- docker0 会为每一个容器分配一个新的 IP 地址并将 docker0 的 IP 地址设置为默认的网关;
- docker0 通过 iptables 中的配置与宿主机器上的网卡相连,所有符合条件的请求都会通过 iptables 转发到 docker0 并由网桥分发给对应的机器;
- 端口映射:将容器内所有暴露的端口(如:3306、80、443)进行映射,将宿主机的ip和端口号映射到容器的端口上。端口映射通过修改 iptables 再将对端口的访问重定向到 docker0,实现对容器的访问;

''' 默认使用 bridge 模式 '''
[root@C2 ~]# docker run --name centos_bridge -itd centos
8ddb65242bd2691dd4d709cb759ca49c81a9eb7ef1e08616bbac3c464e51fe5a    << 172.17.0.2
[root@C2 ~]#
[root@C2 ~]# docker run --name httpd_bridge -p 8080:80 -itd httpd
a10f62455afa8eb7afa37cd0525f863bd4cc743e9dace7a0ee6a47110097b98b    << 172.17.0.3
[root@C2 ~]#

[root@C2 ~]# docker exec -it httpd_bridge bash
root@a10f62455afa:/usr/local/apache2# httpd -k start
AH00558: httpd: Could not reliably determine the server's fully qualified domain name, using 172.17.0.3. Set the 'ServerName' directive globally to suppress this message
httpd (pid 1) already running
root@a10f62455afa:/usr/local/apache2#

[root@C2 ~]# docker exec -it centos_bridge bash
[root@8ddb65242bd2 /]#     ## 默认可以ping 通 docker0(172.17.0.1),可以访问其他容器(172.17.0.3),可以正常访问外网
[root@8ddb65242bd2 /]# curl 172.17.0.3
<html><body><h1>It works!</h1></body></html>
[root@8ddb65242bd2 /]#
从外部网络访问宿主机的 8080 端口,来访问容器的 httpd 服务

host 网络模式
- 如果启动容器的时候使用 host 模式,容器将共享宿主机的网络,容器也不会虚拟出自己的网卡,网络无隔离。
- 容器直接使用宿主机的 IP 和端口,外部可以通过端口直接访问容器,跟 bridge 相比不需要端口映射,不用任何 NAT 转换。
- host 模式仅仅是复用了宿主机的网络,但是容器的其他方面,如文件系统、进程列表等还是和宿主机隔离的。
- host 网络驱动程序仅适用于Linux主机,并且不支持Docker for Mac,Docker for Windows或Docker EE for Windows Server。
[root@C2 ~]# docker run --name httpd_host --net=host -itd httpd
668ec0915703bc092cbadf62d75a66ae446ce6b6990925a2fb189dba399e237b
[root@C2 ~]#
[root@C2 ~]# docker exec -it httpd_host bash
root@C2:/usr/local/apache2# httpd -k start
AH00557: httpd: apr_sockaddr_info_get() failed for C2
AH00558: httpd: Could not reliably determine the server's fully qualified domain name, using 127.0.0.1. Set the 'ServerName' directive globally to suppress this message
httpd (pid 1) already running
root@C2:/usr/local/apache2# exit
exit
''' 放行宿主机的80端口 '''
[root@C2 ~]# firewall-cmd --zone=public --add-port=80/tcp --permanent
success
[root@C2 ~]# firewall-cmd --reload
success
[root@C2 ~]# firewall-cmd --zone=public --query-port=80/tcp
yes
[root@C2 ~]#
从外部网络访问宿主机的 80 端口,来访问容器的 httpd 服务

container 网络模式
- container 模式指定新建的容器和已经存在的一个容器共享相同的网络环境,而不是和宿主机共享。
- 新创建的容器不会创建自己的网卡,两个容器除了网络方面,其他的如文件系统、进程列表等还是相互隔离的。
- 两个容器的进程可以通过 lo 网卡设备通信。

[root@C2 ~]# docker run --name httpd_container --net=container:centos_bridge -itd httpd
6d44833b04927f8c513580b92cc6bd661a5464193fae499843008a1c924eb21e
[root@C2 ~]# docker exec -it httpd_container bash
root@8ddb65242bd2:/usr/local/apache2# httpd -k start
AH00558: httpd: Could not reliably determine the server's fully qualified domain name, using 172.17.0.3. Set the 'ServerName' directive globally to suppress this message
httpd (pid 1) already running
root@8ddb65242bd2:/usr/local/apache2#
root@8ddb65242bd2:/usr/local/apache2# exit
exit
[root@C2 ~]#
[root@C2 ~]# curl 172.17.0.3
<html><body><h1>It works!</h1></body></html>
[root@C2 ~]#
none 模式
- 容器上没有网络,也无任何网络设备。如果需要使用网络,需要用户自行安装和配置。
[root@C2 ~]# docker run --name centos_none --net=none -itd centos
d445cff53c114904a8bf9e0528886b70eb2686ff52dc2c497f8f57eea60e22f9
[root@C2 ~]#
- 总结:几种网络模式中最常用的是 bridge 模式和 container 模式,container 网络模式多用于容器和容器直接频繁交流的情况。
- user-defined 类情况较多,以后重开一篇。
2019年06月23日,完成仓库管理部分
2019年07年20日,完成数据管理部分
2019年09月04日,完成网络管理基础部分
本文由 SHIYL 创作,采用 知识共享署名4.0 国际许可协议进行许可
本站文章除注明转载/出处外,均为本站原创或翻译,转载前请务必署名
最后编辑时间为: Sep 4, 2019 at 11:55 pm
